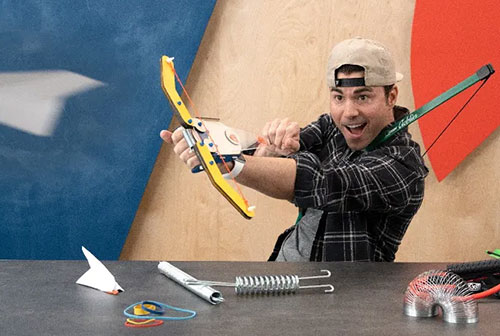
Paper Airplane Launchers
Build a paper airplane launcher to shoot your paper airplanes across the sky at mach speeds.
One of the most common paper airplane activities is to see how far they can fly. The design of the airplane is a critical factor - naturally some designs are better than others. However, another critical factor is the amount of power that goes into the throw. This power comes from the muscles in the arm and upper body, and each person will be limited by their own physique. Long, strong arms have an advantage. This is why a previous world record was thrown by a professional American football quarterback.
An inquisitive and creative person might wonder if there was a way to launch a paper airplane faster and further than they can throw by hand. This is when someone might think about a paper airplane launcher. In this article we will describe the main types of paper airplane launchers, we will review some popular launchers that you can purchase online, and we will lay out plans for you to make your own paper airplane launcher using household materials.
Types of Power
When you throw a paper airplane, the power is coming from the muscles in your arm. Paper airplane launchers need a source of power too. This power can come from mechanically stored potential energy, like a compressed spring, stretched rubber band, pressurized air or something else. The power could also come from the electrical energy stored in a battery that is used to drive a motor, electromagnet or some other mechanism.
Rubber Bands
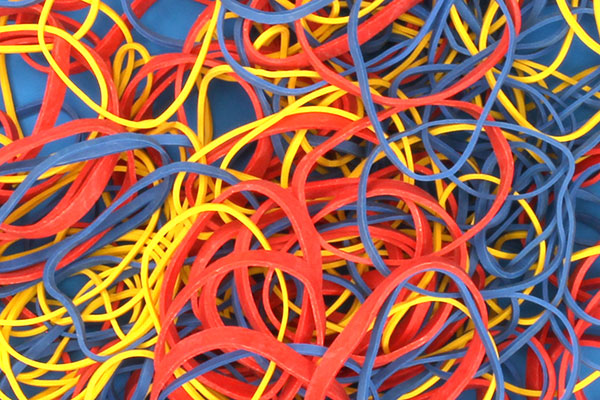
A rubber band is by far the most commonly used power source for paper airplane launchers. Rubber bands are cheap, readily available, safe and easy to use. However, there are two drawbacks to rubber bands. First, a single small rubber band cannot store as much energy as you have in the muscles of your arm. To get around this you can use multiple rubber bands or very large rubber bands. The second drawback is that a rubber band exerts a lot of force on the paper airplane in a brief amount of time. To withstand this abrupt force, the paper airplane needs to be reinforced to make it stiff enough to avoid crumpling or ripping.
In spite of these two drawbacks, rubber band powered paper airplane launchers are the most common because rubber bands are very easy to use. In fact, the simplest launcher is nothing more than a rubber band held between your fingers. By using stiff paper, tape and multiple rubber bands you can make a very powerful launcher that can easily throw the paper airplane further than you can by hand.
Spinning Motors
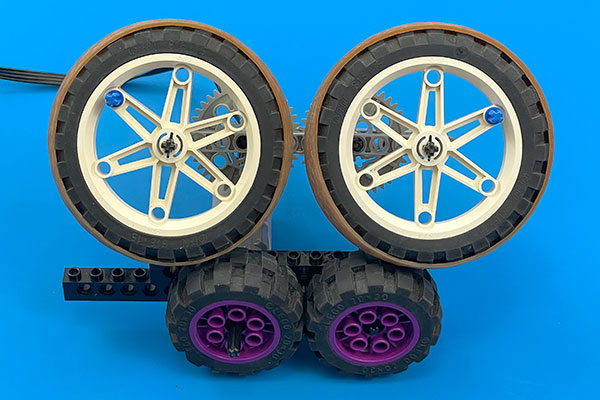
It is possible to use spinning wheels to launch a paper airplane. This works similarly to how a tennis ball or baseball pitching machine throws a ball. Two opposing spinning wheels catch the airplane and quickly accelerate it to high speeds and fling it out the other end.
The average person can throw a paper airplane at around 20 mph (32 kph). In order to reproduce this speed with spinning wheels, you need to get them spinning pretty fast. Think about how fast a car's wheels are rotating when you drive it at moderate speed. Now, think about this 10x faster because your wheels will be much smaller than a car tire. With a 2 inch (5cm) diameter wheel, you will need it to be spinning at 3,400 RPM to equal your throwing speed. This can be a bit of a challenge, but if you have some experience with electronics you should be able to build something that works.
You can use LEGO® motors, wheels, gears and Technic™ pieces to build something relatively quickly, however you might have some difficulty getting the wheels to spin fast enough. Here is chart showing the wheel sizes and RPMs necessary to achieve different throwing speeds.
| Wheel Diameter | 20MPH | 30MPH | 40MPH | 50MPH |
|---|---|---|---|---|
| 1" (2.5 cm) | 6,700 | 10,000 | 13,000 | 17,000 |
| 2" (5.0 cm) | 3,400 | 5,000 | 6,700 | 8,500 |
| 3" (7.5 cm) | 2,200 | 3,400 | 4,500 | 5,600 |
| 4" (10 cm) | 1,700 | 2,500 | 3,400 | 4,200 |
Electromagnets
If you are an expert at electronics and have a lot of time, money and patience, you can build an electromagnet paper airplane launcher. This works similarly to how a magnetically levitated train (Maglev) or railgun work to accelerate cars or projectiles down a straight path using nothing but electromagnets. This has the potential for good speeds, but also requires extreme skills and a bit of danger. But it sure looks fun!
Tom Stanton built one of these on his YouTube channel (above) and we highly recommend checking it out. His electromagnetic paper airplane rail launcher throws airplanes at 26 miles per hour.
Paper Airplane Launcher Kits
There are several kits available that contain all of the parts and instructions necessary to build your own paper airplane launcher. We've purchased the five most popular kits and put them through some tests to help you pick the best one. Four of these kits use rubber bands as their power source and one uses a spring. Unfortunately, none of them were able to launch a paper plane further than a manual throw by hand. In spite of this, these kits are still fun toys to build and play around with.
Kids Paper Catapult Airplane Toy
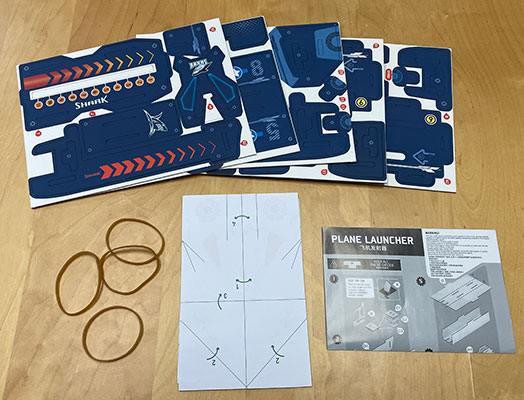
We found this kit under a variety of brand names, so as far as we can tell it's a generic product that gets imported by a variety of companies. In the box you get a stack of sturdy cardboard with die-cut pieces, 4 rubber bands (the launcher required 2), some foldable paper airplane templates and a graphical instruction booklet written in Chinese and broken English. The instructions are not difficult to follow, and it's a fun 30 minute activity to assemble the launcher. The shark graphics make it look pretty cool too! The kit even includes some little targets that you can assemble and then try to knock down with your paper airplanes.
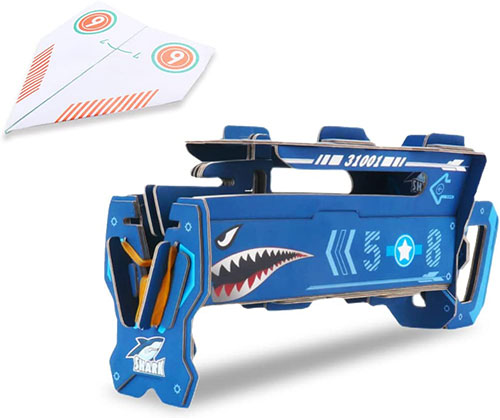
The main drawback with this kit is that it only works with tiny paper airplanes. So, when you run out of the paper that they provide (15 sheets), or if you want to make your own designs, you will need to make your own tiny airplanes by cutting a piece of regular printer paper in half first. We would have preferred it if the launcher accepted regular sized paper airplanes. Another drawback is that this is the weakest launcher that we tested. It launched the airplanes around 12 feet (3.7m), on average.
On the plus side, this kit is easy to assemble, does not require any tools or glue, and is very easy to load and launch. All you need to do is pull back the handle and let go. Perfect for small children.
Sky Surfer Airplane Launcher Link
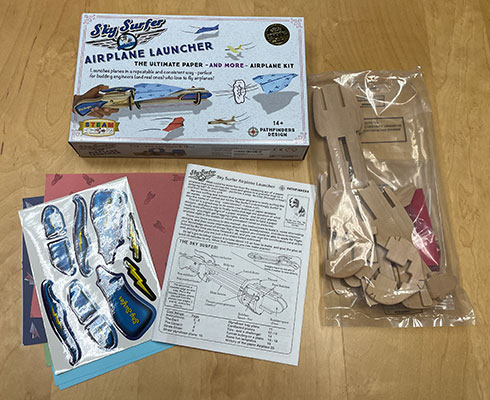
This unique design is from a company called Pathfinders. The kit includes a bag of nice wooden parts, a bunch of rubber bands, some paper for folding airplanes, some stickers and a nice instruction booklet with clear instructions and a section that teaches the basic science of aerodynamics.
This kit also comes with a tube of glue and a piece of sand paper, both of which are needed to assemble this launcher. The assembly requires a little more skill and patience than other kits, but the final product is sturdy and feels high quality. Out of the 4 kits that we tested, this one was the most reliable and versatile. It works with regular paper and doesn't require you to attach any hooks to the planes, so you won't have any trouble when you use up the 4 sheets of paper included with the kit. Almost any paper airplane design will fly from this launcher.
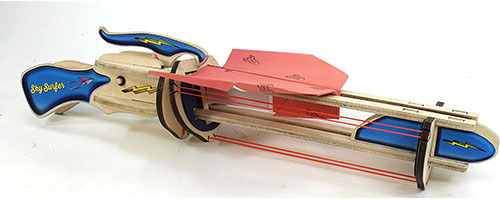
This launcher is easy to load, aim and fire. Additionally, the 4 rubber bands give it a good amount of power. They provide a lot of spare rubber bands, so this launcher will last a long time. In our tests, we were able to launch a Basic Dart around 30 feet (9.1m) on average. We give this one high marks for being high quality, reliable and versatile.
Hexbug Crossfire Airplane Launcher Link
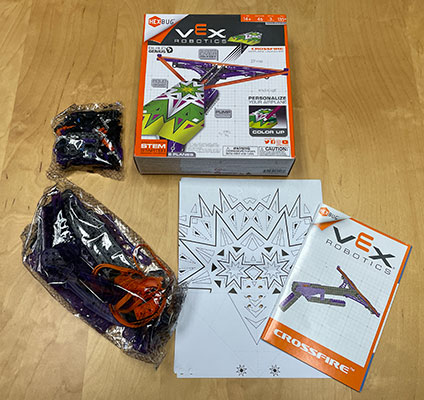
This kit is part of the Hexbug VEX Robotics product line. It contains several bags of plastic snap together parts, some rubber bands (including spares), some paper folding templates and an easy to follow instruction booklet.
The pieces go together easily and it takes about an hour to finish the build. The final product is a sturdy plastic crossbow with a large powerful rubber band. Loading the crossbow is a little tricky. It takes a bit of coordination to pull the rubber band back and arm the itchy trigger. It took our 10yr old tester a few tries, and a few misfires, to figure it out, but he was a pro after a few minutes of practice. The large rubber band does provide a lot of power. It was able to fire the airplanes around 35 feet (10.6m).
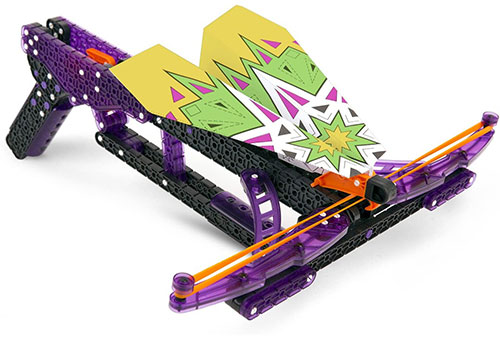
One major drawback to this kit is that you must attach a plastic hook to the front of the paper airplane by threading it through carefully placed holes that are punched into the provided template paper. It only comes with 5 pieces of paper, so if you want to make more, or want to try your own designs, you will need to get a paper hole puncher and carefully punch two holes, half an inch apart. The bulky hook weighs 4.5 grams, which is as much as the actual paper. This significant extra weight at the front totally changes the aerodynamic properties of the paper airplane and makes it fly more like an arrow than an airplane. Three hooks are provided, but they are difficult to detach from the paper airplanes, so swapping them out is a small challenge. Because of all that weight at the front, many glider type paper airplane designs simply don't work, they drop like a rock. It's really only good for narrow darts that fly like an arrow. Overall, this is a fun toy to build and use; it is fairly powerful, but it is not very versatile and may be tricky for smaller children to use safely.
UGears Flight Starter Link
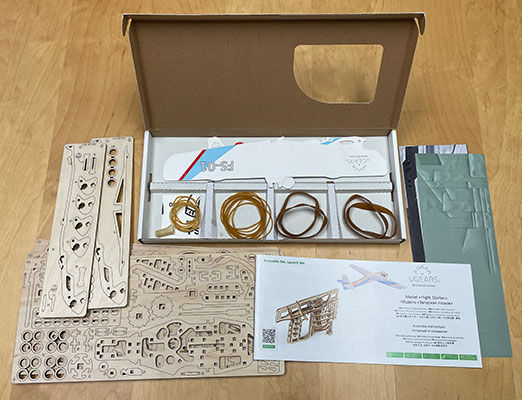
This advanced kit comes with a stack of laser cut wooden tiles containing at least a hundred tiny parts. Also included are an easy to follow instruction booklet, plenty of rubber bands, a few paper airplane templates, and a set of paper wings for making the wooden glider.
Of all the kits we tested, this one takes the most time and skill to assemble. We built this over several days, with about 1-2 hours of work per day. It's quite complicated and you need to be very careful when popping the pieces out of the wooden sheets and assembling the mechanism, because if you break one of the tiny tabs, you'll be out of luck. We recommend using a sharp hobby knife to pre-cut the little tabs holding the pieces into the tiles. Parental supervision is definitely required.
The kit comes with a wooden glider that you can build and launch. It also works with regular paper airplanes.
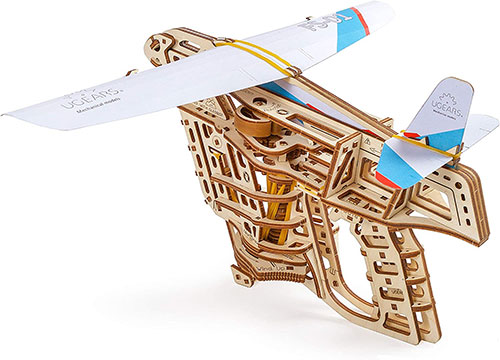
The launcher uses rubber bands as the power source, but it does it in a novel way. The other launchers use a stretched rubber band to directly fling or catapult the airplane. This kit instead uses the stretched rubber bands to spin a shaft that is connected to two wheels. The wheels grip the sides of the airplanes and throw it out the other end of the launcher. This is similar to how motorized paper airplane launchers work, except here rubber bands are replacing the motor.
Unfortunately, in spite of the clever engineering, using this launcher is a bit underwhelming. It only threw a paper airplane 20 feet (6m), which was disappointing after all the time we put into building it. The wooden glider can be thrown by hand and works very well, and the launcher is a beautiful artifact to have on your shelf to display the clever mechanism, so we still think this kit is worthwhile to build, if the engineering and craftsmanship appeals to you.
CrunchLabs Link
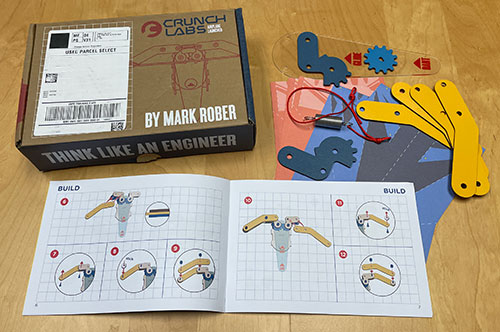
This kit comes from CrunchLabs, a subscription service by YouTuber Mark Rober that sends you a "Build Box" every month that teaches science and engineering skills. The paper airplane launcher is in box number 11. It can't be purchased separately, so you'll need to subscribe for a full year, but it is well worth a subscription. Every month you will receive a box with something cool to build and something interesting to learn. On the way to getting your paper airplane launcher, you'll also build a disc launcher, a coin launcher, two ball launchers and a rocket launcher. Mark must have a thing for launchers!
His paper airplane launcher kit comes with a bag of parts, an instruction book and 10 paper airplane templates (5 each of 2 designs). It also comes with a link to a video where Mark Rober teaches you how springs work using his unique engaging style. Don't skip the video, it's a key part of the experience!
To build the kit you can follow along with the video or use the included instruction booklet. Assembly is straight forward and easy - no tools required. It took our 12 year old about 15 minutes. We like that it uses a spring instead of a rubber band. Rubber bands wear out and break, but the spring will last forever. Our one gripe is that the included hooks are quite heavy (2g) compared to the weight of the airplane itself (3g) which puts the center of mass too far forwards for good flight. Also, the included double sided sticky pads were not very sticky, so our hook kept flying out, leaving the airplane behind. Whoops! No worries, we supplied our own tape and it worked fine. (BTW, the hooks fly great on their own 😊)
The 10 included paper airplane templates let you fold a dart style or glider style airplane. The templates use half sized paper, probably because this was all that could fit in the box. But, you aren't limited to this tiny paper size. We tested it with regular paper and it actually worked better. In fact, you don't even need to use the included hooks, which saves a lot of weight and hassle. Try our Lift-Off Paper Airplane design for a full-sized hook-less paper plane that works better than the ones included in the kit.
In our tests the airplanes consistently flew around 25 feet, so it can't beat a human thrower (none of the kits we tested can), but that's fine because we have a secret hack: Replace the string with a 12 inch rubber band and the spring+rubber combo will launch your paper airplane up to 50 feet! Happy Flying
Easy DIY Paper Airplane Launchers
All of the following DIY paper airplane launchers use rubber bands because they work well and don't require batteries. Rubber bands have two basic ways to apply force to the paper airplane. They can push the airplane from behind, or they can pull the airplane from the front. The following designs use the "pull" mechanism because it works better. To use these, you will need a way to connect the front of your paper airplane to the rubber band. The easiest way to do this is with a paperclip bent into a hook.
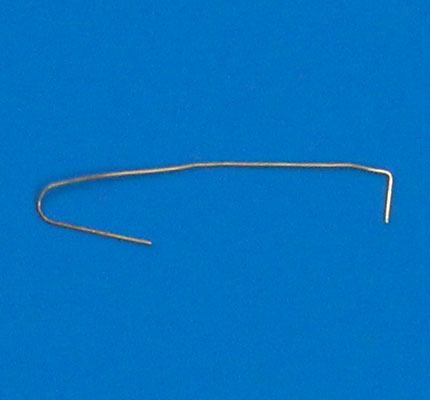
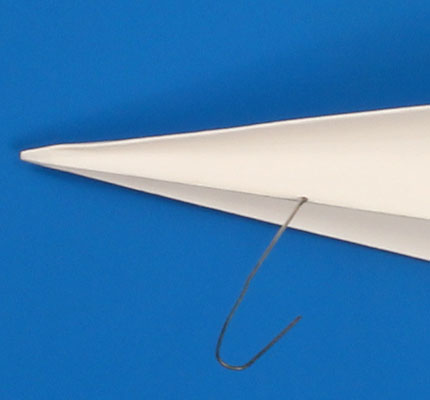
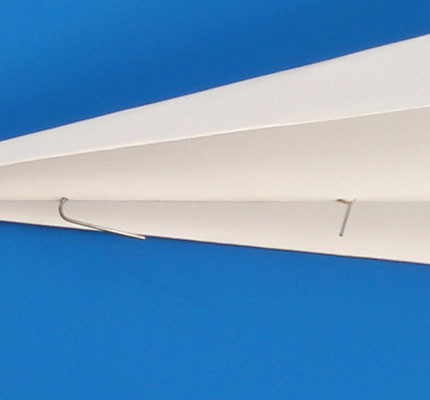
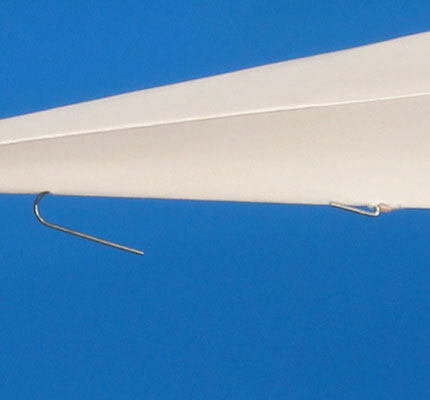
Partially unfold the paperclip so that one U-Turn remains. At the other end, make a short L-Shaped angle piece sticking down. Now, fold your paper airplane with some stiff paper or card-stock. The stiff paper will be necessary to withstand the forces without ripping. Next, take your metal hook and poke it through the paper near the front of the airplane. Thread it through until the U-Turn piece is at the hole and then poke the short L-Shaped piece back out. Fold this small protrusion back towards the front and make it flat. The purpose of this small hook is to keep the paperclip attached to the airplane. If you skip this step, the paperclip will just fly out, leaving you holding the paper airplane in your hand. Embarrassing! Use some tape to make everything secure.
Now you have a paper airplane with a paperclip hook securely attached to it. All you need is a launcher!
Finger + Rubber Band
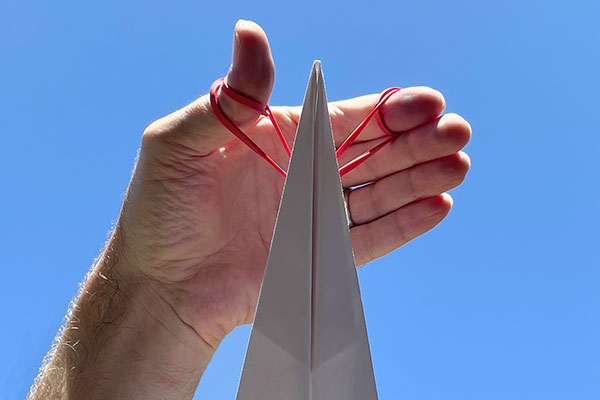
You can't get much more simple than this! Would you believe that a rubber band wrapped around your fingers works better than almost any other paper airplane launcher? The only draw back is that there is a slight chance of getting a paper cut if the airplane rubs your finger as it whizzes by, so be careful (or wear gloves).
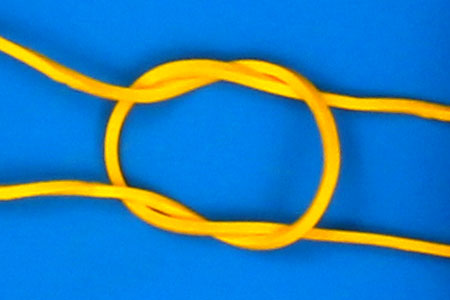
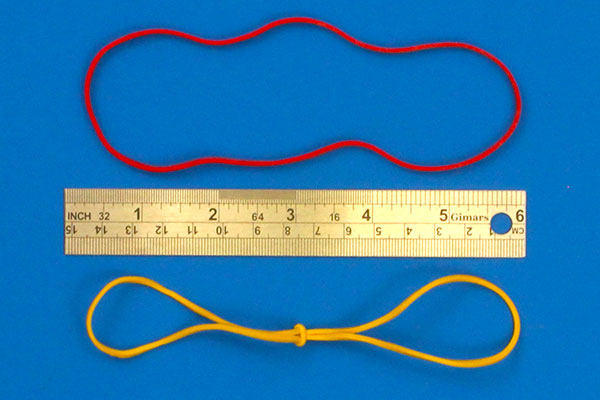
To make this launcher, you need either one long rubber band, or several smaller ones connected together. To link two small rubber bands, pull them through each other at the same time, making a square knot. Link several together until you have something at least 6 inches long.
Now, wrap the rubber band twice around your thumb and index finger. Slip the paperclip over both bands stretched between your fingers. Pull back and let it fly! To avoid having the paper airplane hit your fingers, we recommend you make a little downward flick with your outstretched hand a split second after releasing the paper airplane. It takes a little practice, but with this method you will be launching your paper airplanes into the stratosphere.
Pencil + Rubber Band
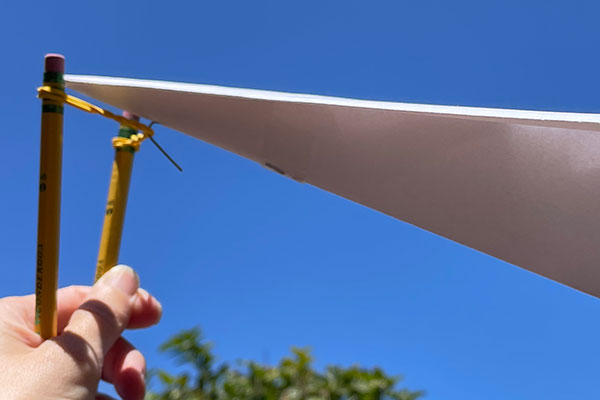
If you don't want to use your fingers, you can easily use some pencils, small dowels or sticks to build a makeshift slingshot.
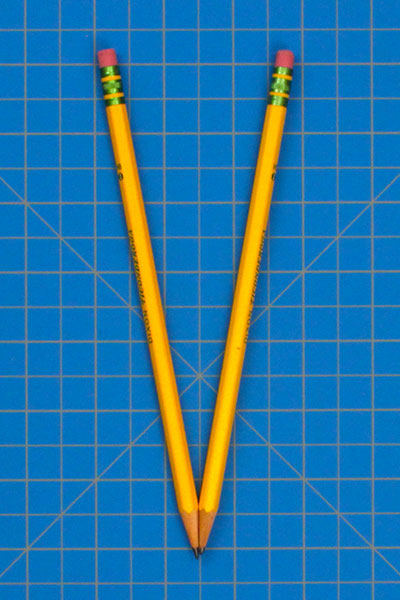
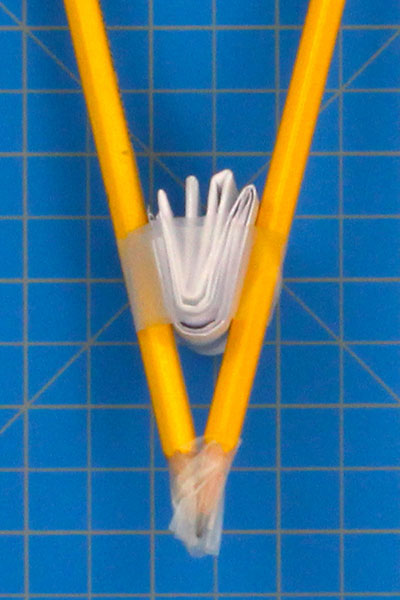
Put the pointy ends of the two pencils together (this makes a good angle) and tape the tips. Next, fold up a piece of scrap paper and wedge it between the two pencils to maintain the appropriate angle. Tape it all together. It doesn't have to be pretty.
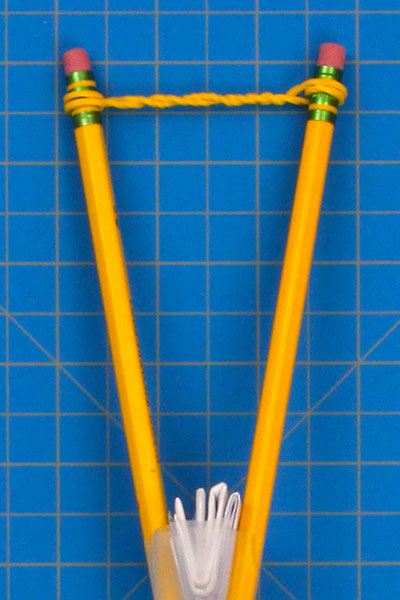
Finally, wrap a rubber band between the two pencils. We recommend wrapping it around each pencil twice and then twisting it between the two pencils. This will make the rubber band grip the pencils better and make it less likely that it will fall off. You can always reinforce with tape here if necessary. A long rubber band will work better than a short one. We recommend at least 6 inches, so you may need to link several rubber bands together for optimal power (see above).
Now, simply hook the paperclip sticking out of your airplane to the rubber band, pull back and let it fly. Always be careful to aim it away from people; you don't want to put an eye out! If you have bad aim, make you and your friends wear safety glasses.
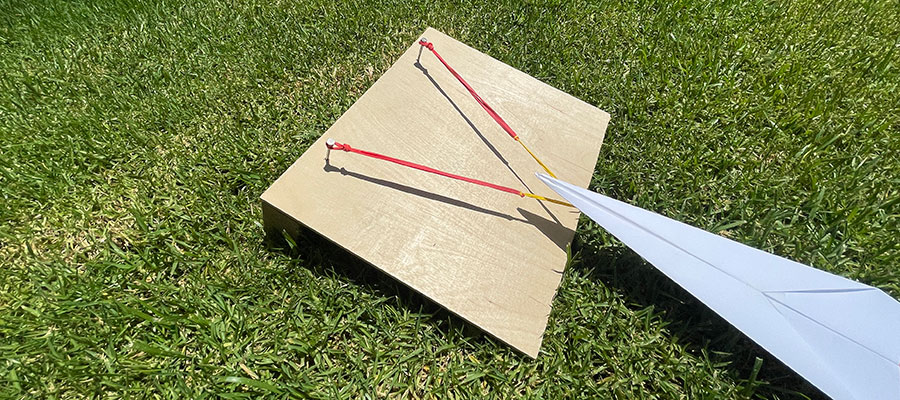
Wooden Plank + Nails
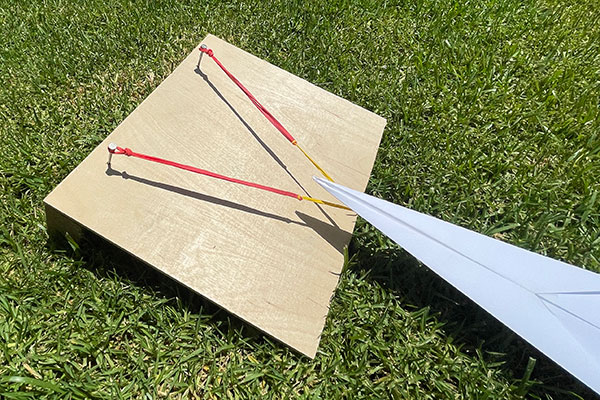
This is a nice step up from the previous two options, but it requires a few tools to make. First, get a small plank of scrap wood. Nail two long nails into one end so they are sticking out. They should be parallel to the front edge. Wrap a long rubber band over each nail and you are ready to go. If you want to get fancy, you can attach a foot under the front so that it will be propped up at a good angle (we recommend 45°).
There are two advantages to this design. For one, you don't have to hold the launcher, so both hands are free to load and pull back on the paper airplane. This may be easier for smaller children. The other advantage is that you aren't limited by your arm span when pulling the airplane back and stretching the rubber band. This means that you can use a really long rubber band. Link a bunch of them together to make a super stretching 2 foot rubber band and you can really fling your paper airplanes pretty far.
One disadvantage to this design is that the launcher needs to rest on a flat surface, typically the ground. When a paper airplane is launched from the ground, it doesn't have very far to fall before it hits the ground, so if you can find a safe way to elevate the launcher up to eye level, that would give you the best chance at a long flight.
Advanced DIY Paper Airplane Launcher Ideas
We are working on some step-by-step instructions for building an advanced motorized paper airplane launcher. So far we have not produced something powerful enough to meet our high standards, but we will keep working on it, and if we are successful we will updated this article and let you know.
In the meantime, if you want to take a crack at it, here are some instructions that we found that you may be able to follow.
Conclusion
As you can see, there are many ways to build a paper airplane launcher. You can purchase a kit or you can do-it-yourself using scrap materials found around the house. Some launchers may not shoot it as far as you can throw by hand, but some can. In the end, it doesn't matter because they are fun to build and play around with on a sunny day. It's also a good opportunity to practice your engineering and making skills.

We hope that you have found something on this page that makes you want to go out and build it. Have fun!