PowerUP Electric RC Paper Airplanes
Turn your favorite paper airplane into an electric RC aircraft that you can steer with your phone.
When you throw a paper airplane, a short battle with gravity determines its flight time, and you have very little control over the trajectory of the flight. Remote controlled model airplanes have propellers that provide thrust, and a wireless controller that allows you to steer, but these hobby aircraft can be expensive and difficult to master. What if there was something "in between", that provided the best of both worlds...?
Good news, everyone! With a PowerUP smart phone controlled paper airplane kit, you can easily turn your favorite Fold'NFly paper airplanes into RC aircraft that you can steer with your phone.
PowerUp Toys Company
PowerUp Toys has been around since 2011, when founder Shai Goitein created the first motorized paper airplane. As a pilot and industrial designer, Shai was uniquely qualified to combine a micro motor and propeller with a miniaturized power source in a lightweight and durable package that is compatible with many different paper airplane designs.
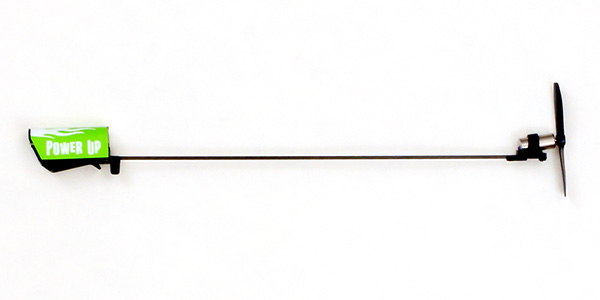
- 2011 - PowerUp 1.0
The first version used a super capacitor and a small propeller capable of 30+ seconds of flight (not remote controlled).
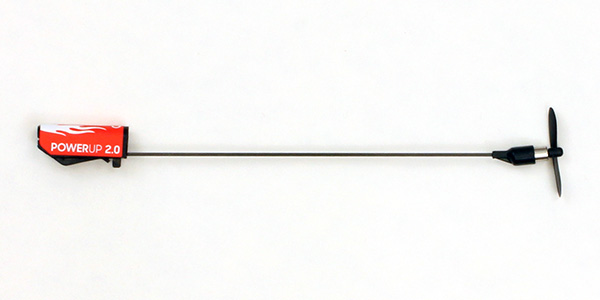
- 2012 - PowerUp 2.0 Link
Improved propeller design increases power and durability. Like its predecessor, it can fully charge in 20 seconds with the included battery pack.
- 2013 - PowerUp 3.0
First ever smartphone-controlled paper airplane. A small rudder provides steering and a Bluetooth connection allows for wireless control. A rechargeable battery provides longer flight times.
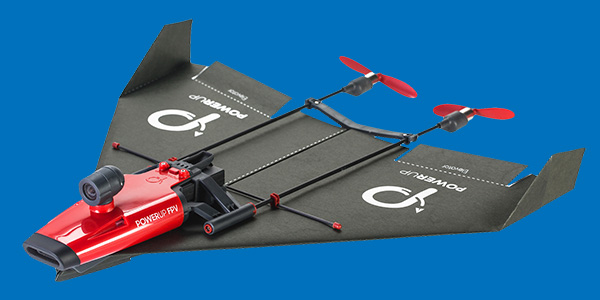
- 2015 - PowerUp FPV (discontinued)
An onboard camera provided a live-streamed view from the cockpit, when paired with a set of VR goggles.
- 2017 - PowerUp Dart (discontinued)
Designed for half-sized paper airplanes which could fly faster and perform aerobatics tricks, like loops and rolls.
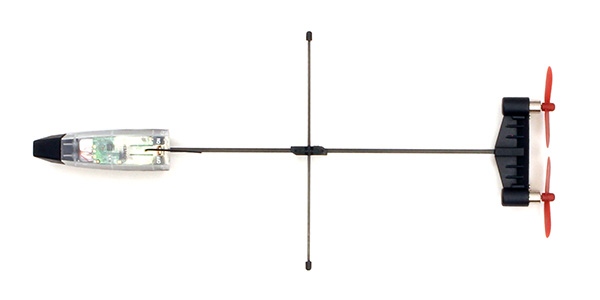
- 2020 - PowerUp 4.0 Link
This dual-propeller system provides both steering and improved thrust. A crossbar and internal sensor help automatically stabilize the flight. Wirelessly control the aircraft with an easy to use smartphone app.
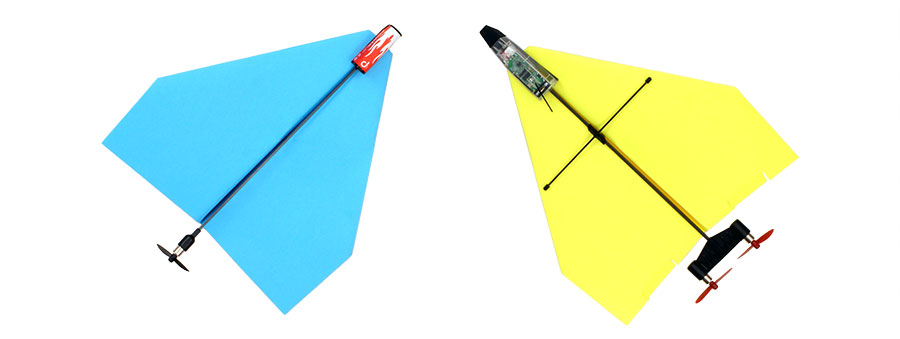
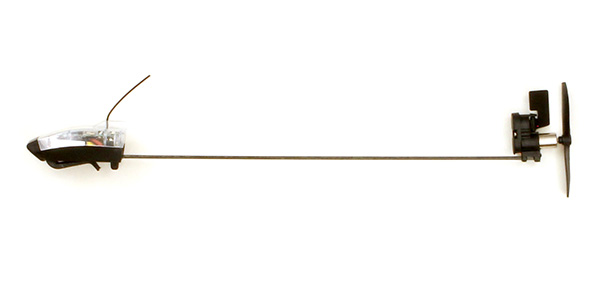
PowerUp 2.0
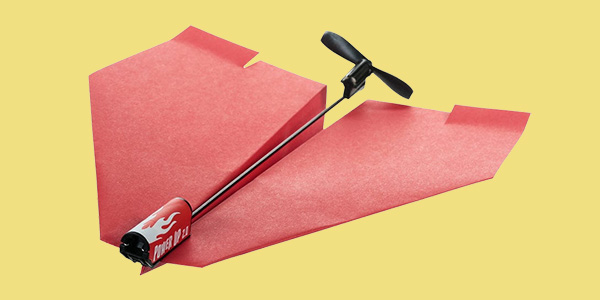
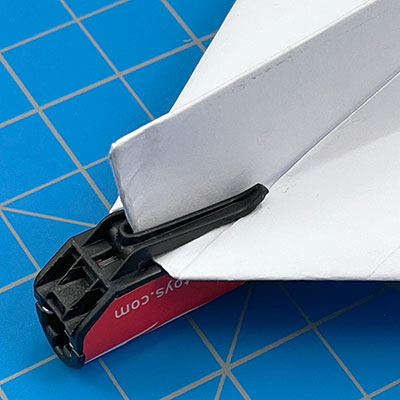
The PowerUP 2.0 Kit contains a single propeller attached to a tiny motor which is itself attached to the end of a thin stick. At the other end of the stick is a capacitor. A capacitor is essentially a tiny battery that can be recharged very quickly. Having the motor and battery at opposite ends provides better balance and ensures that the center of mass for your paper airplane remains in the correct spot. The device clips onto a paper airplane with the propeller in the back. This may seem unusual, because regular airplanes have the propeller in the front, but it makes little difference whether the airplane is being pushed or pulled. With the propeller in the back, it is more protected from hitting objects so it is less likely to break (a spare propeller is included, just in case).
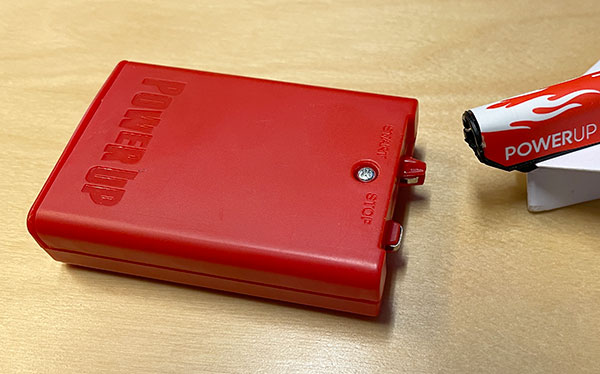
Also included with the kit is a charging pack that takes regular AA batteries. You charge the airplane by inserting the metal prongs labeled "start" into the nose of the PowerUP device. The propeller will immediately start spinning and the capacitor will begin charging. It only takes 10-20 seconds to get a full charge and then you can remove the charger. The propeller will continue to spin and provide usable thrust for 30-40 seconds. You can recharge at any time. The propeller will slowly wind down over several minutes (we timed ours at 6 mins, 23 seconds), although it's going very slowly towards the end. If you want to make it stop early, you can use the special "stop" connector on the charging pack to short out the capacitor and immediately drain all the left over electricity.
Underneath the capacitor, at the front of the PowerUp device, you will find two prongs. This is how you attach it to your paper airplane. These prongs slide onto the front of your airplane and clip it on. You can use a piece of tape on the middle of the stick if you want it to be more secure.
The PowerUp 2.0 packaging claims that you can get 30 seconds of flight time (this just happens to be a hair over the World Record for UNpowered flight). If you pick a good paper airplane design, and adjust it properly for level flight then this is definitely possible. In our testing, we had many flights over 20 seconds. Twenty seconds may not sound impressive, but we promise, when you experience your first 20+ second flight, you will be amazed and elated at how long it feels.
See below for some suggestions of good paper airplane designs to try and some tips and tricks for getting the most out of your PowerUp 2.0 flights.
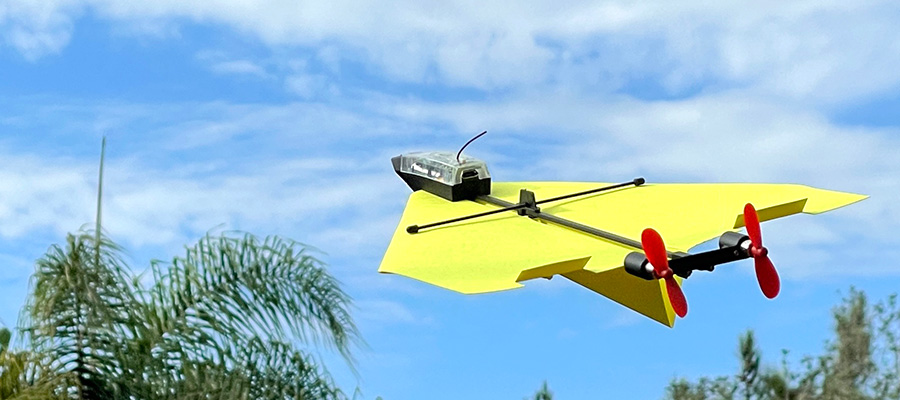
PowerUp 4.0
The PowerUP 4.0 toy is startlingly enjoyable. As you can imagine, we fly a lot of paper airplanes, so it takes something special to get us excited. We had a big grin from ear to ear when our first PowerUP flight crossed the 2 minute mark and kept going and going.
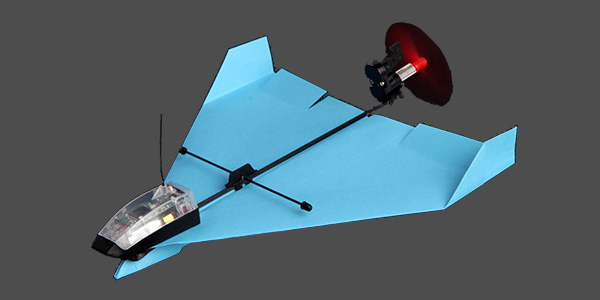
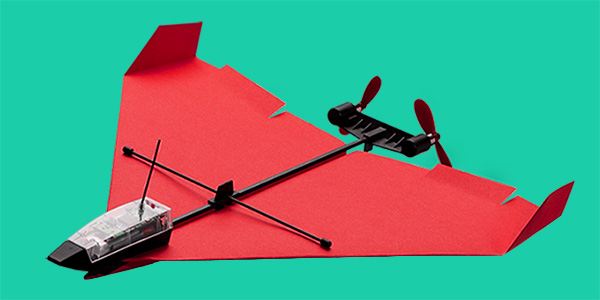
The PowerUp 4.0 Kit comes with a dual motor engine and a smart wireless control module that communicates with a smart phone app (compatible with Apple iOS and Android Phones). You must charge the battery first, using the included USB cable. A full charge takes about 45 minutes and will give you up to 10 minutes of flight time.
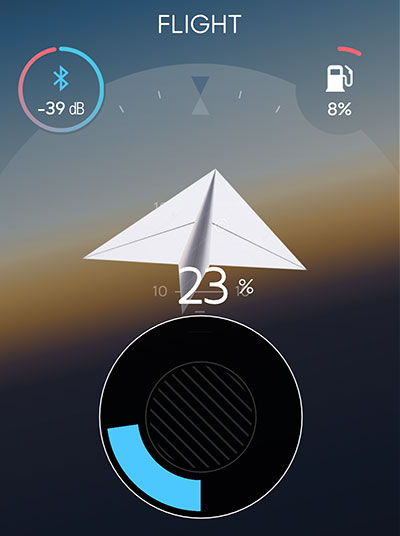
The smart control module has internal sensors that it uses to automatically stabilize the flight of your paper airplane, so a stray gust of wind wont toss it off course. The app (pictured here) allows you to easily control the thrust by moving your finger up and down and steer by tilting the phone left and right. There is very little learning curve and you can easily control your paper airplane one handed without looking at the screen. The app will give you audio feedback, and will call out when you have reached certain milestones, like crossing the 1 minute flight time threshold. The app also shows the battery level inside the airplane, so you'll know how much play time you have left.
In our experience, we had the best success by throttling the speed up to 60-70% during launch and then once the plane has leveled out and climbed a bit, we dialed it back to 30-40%. This reduced thrust was enough to keep the airplane airborne indefinitely, or at least until the batteries run out. We regularly exceeded the 3 minute mark and had lots of fun steering the plane in wide loops and figure eights.
The PowerUP 4.0 packaging claims a communication range of 240 ft (70 meter), which was accurate in our testing. If you happen to fly your airplane out of range, it will shut off the motor and slowly glide back to earth for recovery. When you get back in range, the app will reconnect to the airplane and you will be ready for another flight.
Paper Airplane Designs
There are many different paper airplane designs that will work with both the PowerUP 2.0 and 4.0 toys, but there are a few things to keep in mind. The length of the PowerUP devices are fixed and not adjustable, so the length of your paper airplane needs to match. Long airplanes will not work because the propeller will be positioned in the middle of the body. So, if you want to use a design like the Basic Dart you can't use regular paper. You will need to cut the paper down to a smaller size first. Similarly, a very short design, like the Royal Wing will not work either because the propeller will be way behind the back end.
Another thing to keep in mind is that the plastic clips that attach the device to the airplane are pretty small, so the front of the airplane needs to be thin. If you use a design like the Stunt Plane that has a beefy nose, the clips may not fit. The nose of the airplane needs to be in a T-shape in order for the clips to attach properly. For this reason, a paper airplane design that has a flat fuselage, like the Stealth Glider will not work either.
The kits come with some paper airplane designs that are optimized for the PowerUP devices. We recommend starting out with these for your first flight. Once you get the hang of it, we encourage you to experiment with other designs. We tested a lot of our paper airplanes, and many of them work. The V-Wing is a excellent choice. Experiment and see what you like best!
Wind
Wind plays a big factor in the success of any paper airplane flight, with or without a motor. The PowerUp motor provides a nice amount of thrust, but not enough to compensate for a strong breeze. When it is too windy, the paper airplane will be tossed around randomly in the wind.
It is best to enjoy this activity on a very calm day when the wind is barely noticeable. For your first time flying a PowerUp toy, we highly recommend waiting for a day with zero wind. You'll have a better beginner's experience. When you become more experienced you can try to tackle the wind. If you see tree branches moving in the wind, or if you can hear the wind in your ears, then it's probably too windy.

We used a cheap anemometer to measure the wind speed during each of our excursions to the local park. In our testing, any wind over 3 m/s (5.8 knots) made it difficult to control the airplane. An anemometer is a handy instrument to have, and they aren't too expensive. They're basically a pinwheel with a sensor attached that measures how fast the blades are spinning. On our best outing, with many fun long duration flights, we measured the wind topping out at 0.6 m/s.
If you end up at the park on a windy day, don't despair. You can always fly a kite instead! When the wind blows, fly a kite and when the wind dies down, fly a paper airplane.
Hints & Tips
A powered paper airplane can cover a lot of ground, so make sure you have enough space. We recommend having around 50 feet of space around you in all directions. Standing in the middle of a football or baseball field is good. Try to avoid being too close to any trees, houses or power-lines. The PowerUP 4.0 has a 240 ft (70 meter) communications range, so if you want to really test the limits, you'll need an even bigger space.
Every paper airplane flight ends in an uncontrolled flight into terrain (ie: a crash landing). The PowerUP toys are very durable, but we still recommend using them on grass to cushion the landing and keep them flying for longer.
Trimming your airplane is the technical term for adjusting the wings, rudder and center of mass to get the desired type of controlled flight. You can read all about how to do this in our "How to Steer a Paper Airplane" article. We recommend trimming your electrified paper airplane with the motor turned off. Just throw it, and see if it dives (bend the ailerons up), goes straight up (bend them down) or turns (bend one aileron). Once you have the unpowered airplane flying straight and level, then turn on the motor. You should expect to use more flaps than you normally would with a plain paper airplane.
You'll probably have a temptation to throw your paper airplane as hard as possible. You don't need to do this, and it will actually make the flight worse because the paper airplane will initially be flying faster than the motor can push it. Instead, let the motor do the work for you and launch the paper airplane softly.
Conclusion
You've made it all the way to the bottom of this long review, so you deserve a little reward. For a limited time, use discount code "POWERUP13" when purchasing an airplane kit directly from PowerUp Toys to get 13% off your order.