Does Paper Size Matter?
When making a paper airplane, does the size of the paper matter? Will a small or large paper airplane fly better? Let's find out!
When you make a paper airplane you probably reach for a regular piece of printer paper. This is certainly the most convenient size of paper, but have you ever wondered if printer paper is the ideal size for a paper airplane? Maybe a smaller piece of paper would make a lighter airplane that floats better. Or maybe a larger piece of paper would have wider wings that keep it aloft longer.
Let's experiment with different sizes of paper and discover the answer.
Paper Sizes Around the World
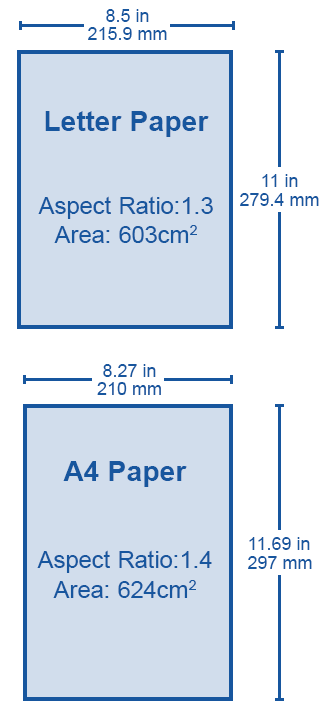
In North America, parts of South America, and the Philippines regular printer paper is called "Letter Paper" and measures 8.5 by 11 inches. The rest of the world mostly uses "A4" paper which measures 210 by 297 millimeters.
The two different sizes of printer paper used throughout the world are similar, but they have slightly different dimensions. If you divide the height by the width, you get the aspect ratio (AR). Letter sized paper has a ratio of 1.3 whereas A4 sized paper has a ratio of 1.4. This means that A4 paper is slightly taller and skinnier than letter paper.
Letter sized paper has an area of 603cm2 and A4 paper has an area of 624cm2. These small differences don't affect the paper airplanes, but larger differences might, and that's what we want to figure out. Now that we know the dimensions of the paper that we use, let's figure out how to make larger and smaller airplanes.
Lets Make Some Smaller Paper
When making different sizes of paper airplanes, we need to be consistent and use paper that has the same aspect ratio, otherwise the designs won't come out the same when you fold them. It usually isn't possible to purchase differently sized paper with the same aspect ratios, so we'll have to make it ourselves. Don't worry, it's easy to make any size of paper with a specific aspect ratio. Simply pick the width (the small dimension) and then multiply this by the aspect ratio to get the height (the long dimension).
A4 Paper Resizing
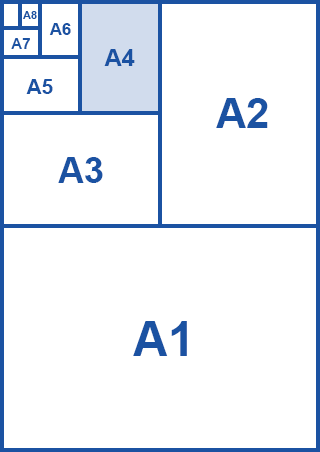
If you are lucky enough to live in a place where A4 Paper is standard, then you are in luck! This size of paper was designed to be cut in half. In fact, it all starts with a larger piece of paper called A0 which is defined as having an area of 1m2 and an aspect ratio of √2 (~1.414). By cutting this in half you get an A1 paper. Cut in half again and you get an A2 paper. Halve it twice more and you are back to our standard A4 paper. We can use this mathematical convenience to make smaller pieces of paper with the same dimensions. Simply, cut your A4 paper in half to make two pieces of A5. Cut one of those in half to make an A6 and so on. With one piece of paper you can make four or five smaller pieces, each one with the exact same aspect ratio. Now, just fold your tiny airplanes!
Letter Paper Resizing
If you happen to use Letter Paper, it's not so easy. But don't worry, we'll help you do the math. Letter paper has an aspect ratio of 1.3. If you cut it in half, the new piece will have an aspect ratio of 1.5 which doesn't do us any good. A paper airplane folded with this paper shape will look different than one folded with regular letter paper.
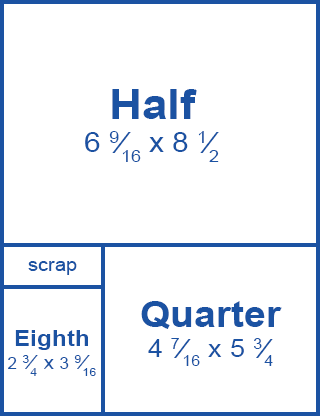
Get out your ruler, because here are the dimensions that you need to measure to turn one piece of paper into three smaller pieces with the same aspect ratio. The area of each size is roughly half of the previous size.
- Half: 6 9⁄16 x 8 1⁄2 inches
- Quarter: 4 7⁄16 x 5 3⁄4 inches
- Eighth: 2 3⁄4 x 3 9⁄16 inches
Don't want to measure all that? We don't blame you. Lucky for you, we made a template that you can download and print. Just cut along the lines.
Lets Make Some Larger Paper
For those people who use Letter Paper, the largest size of single sheet paper that you can typically find is called "Ledger" or "Tabloid" paper. It measures 11 x 17 inches. If you cut this down to 11 x 14.25, you'll have a piece of paper with the correct aspect ratio, and it will have about 70% more area than a standard sheet. If you look in art supply stores you can find drawing paper as large as 18 x 24 inches which you'll need to cut to the correct aspect ratio.
For those people who use A4 paper, it should be pretty easy to find A3 paper, which is twice the size. You can sometimes even find A2 paper, which is four times the size of regular paper. A3 and A2 paper is already the correct aspect ratio, so no cutting is necessary.
If you want even larger paper than this, you'll need to find a roll of butcher paper which comes in sizes up to 36 inches or 1 meter on the short side. This will give you a truly gigantic paper airplane.
Purchase Large Paper
If you decided to get some butcher paper, keep in mind that it will be rolled up and the paper will want to stay curled up after you cut a piece to size. If you fold a paper airplane with paper that wants to curl it won't work very well. You'll need to flatten it out first. One way to do this is to lay the paper flat with some heavy items on the corner and let it sit for awhile. If you are feeling impatient, you can try rolling the paper up in the reverse direction than the way it naturally wants to curl. This will undo some of the curl. You may have to do this a few times to get it flat. Be careful that you don't accidentally crease the paper.
If you want to make any size that we didn't mention, it's easy to do.
- Pick the short dimension (width) to be whatever you want.
- Multiply this by the aspect ratio that you want (either 1.3 or 1.4). This will give you the long dimension (length).
- Measure carefully and cut.
Paper Airplane Distance Experiment
Pick your favorite paper airplane design that you use for distance. We recommend the Basic Dart for this experiment because it is quick and easy to fold. Using the same design, fold a bunch of paper airplanes using the different sizes of paper that you made earlier.
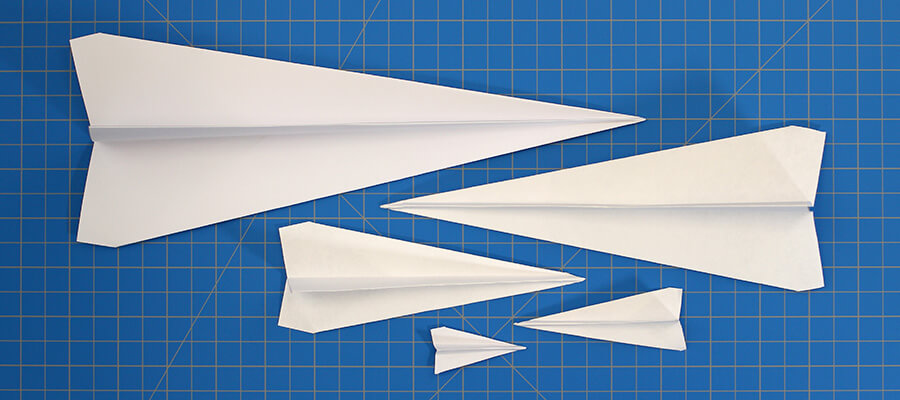
Now that we have some paper airplanes of various sizes, lets experiment! But first, lets make a hypothesis, or guess, as to which airplane will fly the furthest. Will the tiny airplane be heavy enough to overcome air resistance? Will the gigantic airplane be too heavy and floppy to throw? Make some predictions before we try it out. Our hypothesis is that regular printer paper is not the perfect size for making paper airplanes that fly the furthest.

We need a way to measure large distances. If you have a really long tape measure, you can use that. A cheap alternative is to use a long piece of string. Mark off every 5 feet with a pen or a knot and you are ready to go.
Find yourself a big open space to run your experiment. Indoor areas like gyms are preferable because there won't be any wind, but you can run the experiment outdoors if the wind isn't too gusty.
Ok! Finally! We're ready to throw some paper airplanes! Throw all of your airplanes and measure the distances. Be consistent with your throws. This means have the same person throw each paper airplane from the same spot, in the same direction, at the same angle, with the same amount of force. Throw each size multiple times to get a range of distances that you can average. Write down all of your measurements.
Try changing one variable and re-run the experiment. For example, you could try throwing the airplanes harder or at a steeper angle and see if that makes a difference. If you change a variable, be sure to throw each airplane a few times with that new variable and write down all of your measurements.
We'll learn how to analyze our results a little later, but first lets try another experiment.
Paper Airplane Gliding Experiment
We finished our experiment on distance and have some good results, but what if we change the goal of the experiment to time aloft? Will that give us different results? When going for distance, you typically want an airplane that goes fast and straight. If you want your airplane to stay aloft the longest, you might want to build a glider that floats and flies slower.
Let's pick a glider type paper airplane. We recommend the Stealth Glider because it glides consistently without much adjustment.
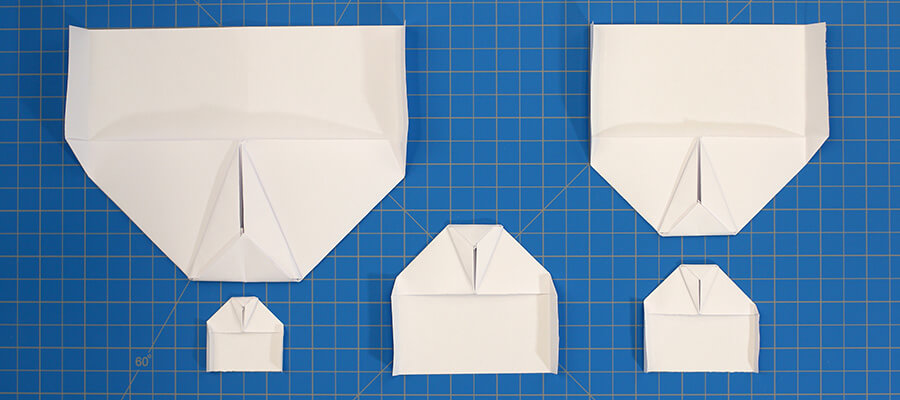
This time, we aren't going for distance so we won't be using a measuring tape or string to collect the data. Instead, we can use a stopwatch to keep track of how long each airplane stays in the air. You'll need one person to operate the stopwatch while another person throws the airplanes.
Before you throw the airplanes, don't forget to make a hypothesis. Take your best guess about which size paper airplane will stay aloft the longest. Will the tiny one catch enough air? Will the huge glider be too heavy?
As with the distance experiment, throw all of your paper airplanes in a consistent manner (Same direction, same angle, same speed, etc). Throw each size multiple times and record all of your data so we can analyze it later.
Analyzing Your Results
Once you have collected all of your data, it's time to analyze the results. We are going to do this by plotting the results on a graph. So, get some graph paper and draw a blank graph with an x and y axis. The x-axis (horizontal) is going to be the size of the paper. Use the width of each piece of paper as the number to plot on the x-axis. The y-axis (vertical) is going to be distance or time aloft (depending on the experiment). For each throw, plot a dot on the graph. For example, if your 8.5 x 11 inch paper airplane flew 48 feet, you would move along the x-axis to the 8.5 mark and then move up the y-axis to the 48 mark and draw your dot. You should end up with a graph that looks something like this. The red dot is the one we just drew.
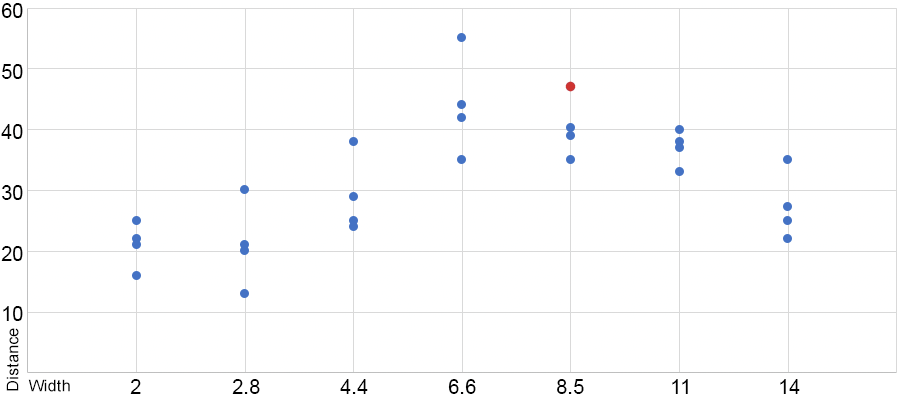
This graph shows our results from conducting a distance experiment with a Basic Dart outdoors with a light breeze. The thrower was a 9yr old boy who was throwing each airplane as hard as he could. Note the importance of throwing each airplane multiple times. The best throw of the 4.4 inch airplane was better than the worst throw of the 6.6 inch airplane, but the average throw of each was the opposite. If we had collected even more data, perhaps with more airplanes of different sizes, we would get a better picture.
What can you conclude from this graph?
Conclusion
From our experiment, it would appear that the smallest airplanes are the worst performers, followed by the largest airplanes. There was a sweet spot around the middle, with the best performer being the paper airplane that started with a 6.6 x 8.5 inch size. The regular size 8.5 x 11 inch paper came in a close second. What did your results show? If you haven't done it yet, we encourage you to try it yourself!
Did your results match your hypothesis? Our hypothesis was that regular printer paper wasn't the ideal size for a paper airplane, and our results suggest that this is true. A slightly smaller airplane seems to go further.
There are many factors that can contribute to different results: wind, angle of throw, height of throw, power of throw, type of paper, etc. If the experiment were repeated with different conditions, you could compare the results and perhaps reach a different conclusion.
Each airplane design has unique aerodynamic properties. A different style of airplane may produce totally different results. You could repeat this experiment with a few different designs and see if you reach the same conclusion.
Congratulations! You just finished a fun experiment with paper airplanes! If this was interesting, you should check out our other experiment where we see if the weight of paper affects paper airplane performance.
